My 1946 120 Resto project N77220

Selected posts from old maintenance forum
Post Reply
User avatar
6643
Posts: 2337
Joined: Tue May 01, 2018 7:00 am
Location: KLCI
Name: John C
Aircraft Type: 1946 C140/C90
Occupation-Interests: A&P, semi-retired
Contact:

Re: My 1946 120 Resto project N77220

Post by 6643 »

Kazoo120 » Sat Dec 29, 2012 2:21 pm

Now being able to easily lift the fuse off the ground, I could remove the wheels and landing gear struts. Had to put some weight on the tail for a bit until I got the struts off. The wheels came off no problem, I can see what I've read about the clips on the original Goodyear brakes. Then I removed the 2 bolts holding the wedges on each side, and the brake lines and foot step, then tapped the landing gear front-to-back with a larger rubber mallet until the main mounting bolts loosened and could be pulled out. These baby's are heavier than I thought, sort of surprised me.

landing gear removed
imag0818_518.jpg (23.89 KiB) Viewed 7067 times
Lifted in sling
Lifted in sling
100_3087_222.jpg (35.37 KiB) Viewed 7067 times
User avatar
6643
Posts: 2337
Joined: Tue May 01, 2018 7:00 am
Location: KLCI
Name: John C
Aircraft Type: 1946 C140/C90
Occupation-Interests: A&P, semi-retired
Contact:

Re: My 1946 120 Resto project N77220

Post by 6643 »

Kazoo120 » Sat Dec 29, 2012 2:35 pm

Now with the landing gear and tail finally removed, I can get to the real goal of the Chirstmas break, to see how much the aluminum skins will polish. I bought the Nuvite materials and some compounding pads etc, and it's a lot of reading before you begin. I started polishing some areas and saw that I needed to sand some of the raised deposits first. The buffing compounds can't remove everything I seem to realize. There's no deep pitting at all on the surfaces, once the dirt and light corrosion are removed. I've buffed some areas and it's looking positive at this point, the goal is not to have to paint if I can rework the metal. It's as much work as reputed,,,,

100_3094_108.jpg
100_3094_108.jpg (224.87 KiB) Viewed 7066 times
Situated for polishing
imag0817_238.jpg (24.71 KiB) Viewed 7066 times
First panels in work
imag0831_196.jpg (24.13 KiB) Viewed 7066 times
User avatar
6643
Posts: 2337
Joined: Tue May 01, 2018 7:00 am
Location: KLCI
Name: John C
Aircraft Type: 1946 C140/C90
Occupation-Interests: A&P, semi-retired
Contact:

Re: My 1946 120 Resto project N77220

Post by 6643 »

Kazoo120 » Sun Dec 30, 2012 11:12 am

Worked on windshield removal yesterday, with help from an A&P I work with. Want to remove the windshield for ease of cleanup and repainting etc,. It was installed new in 1967, just before the plane was stored for many years, so the shield is very clean and clear. Has lots of "putty" on the lower strip, so it's slow going for removal. Plan to pull the lower inner strip as well, to reseal under it. a few more hours and should have it out.

wood shims worked nicely to lift the strip and free the old glues
100_3097_623.jpg (37.72 KiB) Viewed 7065 times
Seems they used alot of sealer last time it was installed,,,,
100_3096_196.jpg (29.53 KiB) Viewed 7065 times
User avatar
6643
Posts: 2337
Joined: Tue May 01, 2018 7:00 am
Location: KLCI
Name: John C
Aircraft Type: 1946 C140/C90
Occupation-Interests: A&P, semi-retired
Contact:

Re: My 1946 120 Resto project N77220

Post by 6643 »

Kazoo120 » Mon Dec 31, 2012 9:56 am

Wndshield is out, just needed to clean off some more of the old glue that was still around the lower inner strip. Had to drill the 2 larger rivets at the ends on the lower inner strip, to remove it. Used a heat gun on low and plastic scraper to carefully clean the black sealer off, and then thinner to remove the final traces. Clean now and can be prepped for paint when the time comes. Interestingly this plane has a "maroon" dash and interior, this seems to be in deference to the parts manual color charts, that list the 1946 planes as having red interior the same as the exterior striping. There's a patch of the maroon color under the ID plate, that is still as original as I have found on the plane, I may see if a paint dealer will bring out a color gauge to match the shade.

Windshield removed
Windshield removed
imag0837_115.jpg (25.15 KiB) Viewed 7065 times
Dash area cleaned, noting deeper reddish or maroon color inside
imag0838_374.jpg (22.24 KiB) Viewed 7065 times
User avatar
6643
Posts: 2337
Joined: Tue May 01, 2018 7:00 am
Location: KLCI
Name: John C
Aircraft Type: 1946 C140/C90
Occupation-Interests: A&P, semi-retired
Contact:

Pictures from Dan

Post by 6643 »

skyviewflier » Thu Jan 03, 2013 9:19 pm

Here are some shots I took when you first got it home...

Horiz skin surface.
Horiz skin surface.
dscn0413s_175.jpg (427.72 KiB) Viewed 7065 times
Fuel gage
Fuel gage
dscn0426s_184.jpg (304.9 KiB) Viewed 7065 times
Panel shot
Panel shot
dscn0410s_804.jpg (391.28 KiB) Viewed 7065 times
Aileron bellcrank home...
dscn0420s_190.jpg (396.65 KiB) Viewed 7065 times
Tailwheel
Tailwheel
dscn0415s_160.jpg (490.13 KiB) Viewed 7065 times
User avatar
6643
Posts: 2337
Joined: Tue May 01, 2018 7:00 am
Location: KLCI
Name: John C
Aircraft Type: 1946 C140/C90
Occupation-Interests: A&P, semi-retired
Contact:

Re: My 1946 120 Resto project N77220

Post by 6643 »

Kazoo120 » Sat Jan 05, 2013 1:22 pm

Built a smaller/low holding fixture now, to be better able to work on the top of the fuse. I must like making fixtures,,, but they're easy and I still have a bunch of 2X4's left over from a pole building project this past summer.... I'm spending alot of time working on the metal surfaces, it's slow work. Began stripping the old paint and numbers off this weekend as well.

In the new lower holding fixture
100_3114_175.jpg (34.98 KiB) Viewed 7063 times
Fuse top
Fuse top
100_3116_280.jpg (30.85 KiB) Viewed 7063 times
Windshield area cleaned up now
100_3102_210.jpg (34.96 KiB) Viewed 7063 times
Stripping the old stripes and numbers
imag0853_155.jpg (20.11 KiB) Viewed 7063 times
User avatar
6643
Posts: 2337
Joined: Tue May 01, 2018 7:00 am
Location: KLCI
Name: John C
Aircraft Type: 1946 C140/C90
Occupation-Interests: A&P, semi-retired
Contact:

Re: My 1946 120 Resto project N77220

Post by 6643 »

Kazoo120 » Sat Jan 12, 2013 1:09 pm

Continued working on cleaning of the fuselage. Only had one evening to work on it this week. There's a light layer of surface corrosion or scaling on the fuse, and I've been working it with Scotchbrite and superfine aluminum oxide paper. It's a SLOW and incomplete process so have been wondering about other chemical methods of removal. I live close to the Kalamazoo AirZoo up this way, and have sent them a note asking about expertise in aluminum restoration, since they restore aircraft for their museum collection. Will await their return note. The Nuvite compounding is not acting the way the websites describe, I need some further expertise on this part of the restoration,,,,

All old striping removed, compounding with Nuvite on upper surfaces
imag0856_192.jpg (19.47 KiB) Viewed 7062 times
Nuvite C6 and F7 being used.
imag0857_737.jpg (18.68 KiB) Viewed 7062 times
Right side of fuse
Right side of fuse
imag0858_191.jpg (21.1 KiB) Viewed 7062 times
User avatar
6643
Posts: 2337
Joined: Tue May 01, 2018 7:00 am
Location: KLCI
Name: John C
Aircraft Type: 1946 C140/C90
Occupation-Interests: A&P, semi-retired
Contact:

Re: My 1946 120 Resto project N77220

Post by 6643 »

Kazoo120 » Sat Jan 26, 2013 9:47 am

After quire abit of review we've decided to paint the aircraft. Lots of input from knowledgable sources, and this seems to be the best route in consideration of protecting the metals going forward. I still think to paint it silver and put the factory Cessna striping back on. Should be nice when finished, I can paint it at my shop, we've painted many racecars in the past. Jeff Tourt has offered advice so far, which is great after looking at his fantastic work. It'll be awhile now before we'll do more work on any finishing prep, so onto other fuse work.

Up close view of the fuselage surface. We'll work this later in preparation for paint.
100_3135_902.jpg (37.16 KiB) Viewed 7062 times
User avatar
6643
Posts: 2337
Joined: Tue May 01, 2018 7:00 am
Location: KLCI
Name: John C
Aircraft Type: 1946 C140/C90
Occupation-Interests: A&P, semi-retired
Contact:

Re: My 1946 120 Resto project N77220

Post by 6643 »

Kazoo120 » Sat Jan 26, 2013 10:19 am

So it was on to other disassembly! I've been wanting to get under the cowl and remove the gauge panel, cables, old insulation, etc, for somtime now. I fashioned a raised head-support in the footwell to make it easier to work under it (without neck cramps), and put some old boat cushions in the seat pockets and then cardboard over all that to lay on. It's quite comfortable to lay under there to work. I brought a pair of old slippers out to wear when I'm scooting around inside. Don't real A&P's wear slippers when working under aircraft gauge panels? Wouldn't see why not. Although maybe the other A&P's would laugh at them...... I don't care, they're comfortable.

In the process of disassy.
100_3174_590.jpg (36.8 KiB) Viewed 7061 times
In the interest of comfort
imag0871_166.jpg (23.12 KiB) Viewed 7061 times
Full size mattress
Full size mattress
imag0869_178.jpg (21.9 KiB) Viewed 7061 times
A&P slippers
A&P slippers
imag0879_212.jpg (21.9 KiB) Viewed 7061 times
User avatar
6643
Posts: 2337
Joined: Tue May 01, 2018 7:00 am
Location: KLCI
Name: John C
Aircraft Type: 1946 C140/C90
Occupation-Interests: A&P, semi-retired
Contact:

Re: My 1946 120 Resto project N77220

Post by 6643 »

Kazoo120 » Sat Jan 26, 2013 10:29 am

I'd like to spec out the control panel for the 120. Meaning what panel gauges and other items will be installed, as we restore the airplane. I sort of have a goal to keep the panel as original as possible, adding gauges that might have been factory options in the slots that are open, and adding anything that's necessary to the utility of using the airplane, with as minimal impact (to the original layout, and weight) as possible.

I think that I would like to consider:

Gauges:

1. Renew or replace the altimeter. Refurb the original or get another unit? New? used? Gauge looks to have been replaced at some point, it's a "Square D" altimeter.
2. Renew or replace the airspeed indicator. Refurb the original or get another unit? New? used?
3. Renew or replace the Tachometer. Refurb the original or get another unit? New? used?
4. Add a rate of climb/descent gauge? What make/model? (in extra panel opening not currently being used)
5. Add a turn and bank indicator? What make/model? (in extra panel opening not currently being used)
6. Add Attitude indicator? Make/model/size/features/mount/approx cost/source?
7. Add Electric Compass? or other gauge, in smaller opening not being used? Make/model/size/features/mount/approx cost/source?
8. Add time clock?

Avionics:

9. Add Nav/Com? Make/model/size/features desired/mount/approx cost/source/new/used/antenna?
10. Add Transponder? Make/model/size/features/mount/approx cost/source/new/used/antenna?
11. Add GPS? Make/model/size/features/rolling map/ADS-B/panel mount/upper dash mount/Ipad knee unit/approx cost/source?

Other cockpit or fuselage related items:

12. Keep Fuses or Add circuit breakers? Make/model/approx cost?
13. Add Intercom! Definitely want this. Make/model/approx cost?
14. Add Strobes? Make/model/size/features/mount/approx cost/source?
15. Add ELT(mandatory). Make/model/size/features/mount/approx cost/source/antenna?
16. Add EGT/CHT gauge? Make/model/size/features/mount/approx cost/source?
17. Add IGN key? or Pushbutton?
17a. Assuming we Add updated starter with solenoid... To replace the pull handle type starter.
18. Fuel select valve? Renew existing? or Add new with L/R/Both/Off selections? or Add new with existing L/R/Off selections? STC item.
19. Landing light. Add in wing? (fixed type, not the electrically retracting one) per STC.
20. Add Manifold vacuum gauge?
21. Add Hobb's meter?
22. Add Other gauges or Avionics? Suggestions for other items? Center of console is possibly open for another cutout.


For reference, the existing layout includes:

(Gauges)
-Altimeter
-Airspeed
-Oil pssr
-Oil temp
-Tach
-Ammeter
-Compass (floating)
(Switches)
-Master electrical (switch)
-Mag (2 switches)
-Landing light (switch)
-Nav lights (switch)
(Pull cables)
-Carb heat
-Cabin heat (laughable I've heard)
-Brake lock (Parking/Brake lock)
-Pull start
(Other)
-Primer

Lots of possibilities here, in general people want me to leave the panel as original as possible, which does seem like a good goal.

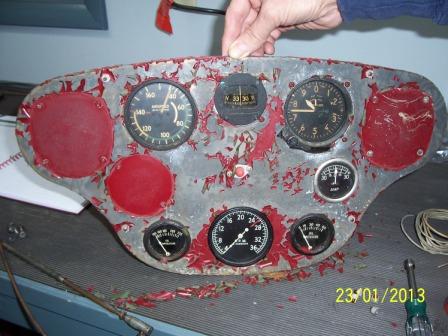
Gauge panel as I removed it, paint fell off of the inner panel! Magnesium?
100_3168_325.jpg (42.09 KiB) Viewed 7061 times
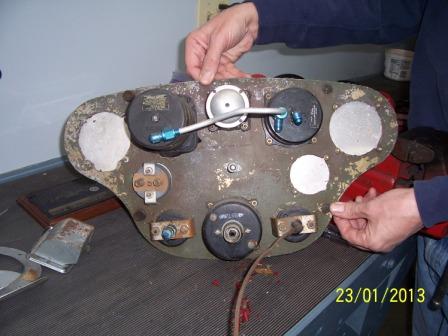
Panel Rear. Interesting there's a red light bulb in the center, that illuminates between the inner and outer panels. I was wondering how the gauges were lit.
100_3169_115.jpg (35.22 KiB) Viewed 7061 times
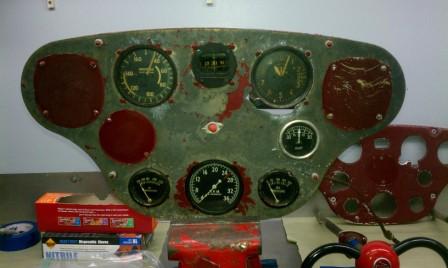
What to add from here.....
imag0876_113.jpg (26.02 KiB) Viewed 7061 times
Post Reply

Who is online

Users browsing this forum: No registered users and 3 guests